
如今,所有網路應用程式都需要用戶登入並分享他們的資訊以建立自己的個人資料。這有助於應用程式安全地為他們提供個人化體驗。開發人員可以透過兩種方式對使用者進行身份驗證 - 他們可以創建自己的身份驗證系統,也可以使用 身分和存取管理服務 透過內建登入頁面提供安全的使用者註冊和登入功能。
這篇文章示範如何使用以下命令輕鬆地將身份驗證新增至 任何 Javascript 單頁應用程式 (SPA) Authgear.
為什麼選擇Authgear?
如果您在應用程式中使用 Authgear,這就像將登入程序傳送到一個主登入頁面,類似於 Google 對 Gmail、YouTube 和其他應用程式的處理方式。您可以輕鬆地將身份驗證功能整合到您的應用程式中(角, 維埃, 反應,或任何 JavaScript 網站)。它通常只需要幾行程式碼來啟用多種身份驗證方法,例如 社群登入, 無密碼, 生物辨識登入, 一次性密碼 (OTP) 具有 SMS/WhatsApp 和多重身份驗證 (MFA)。
它是如何運作的
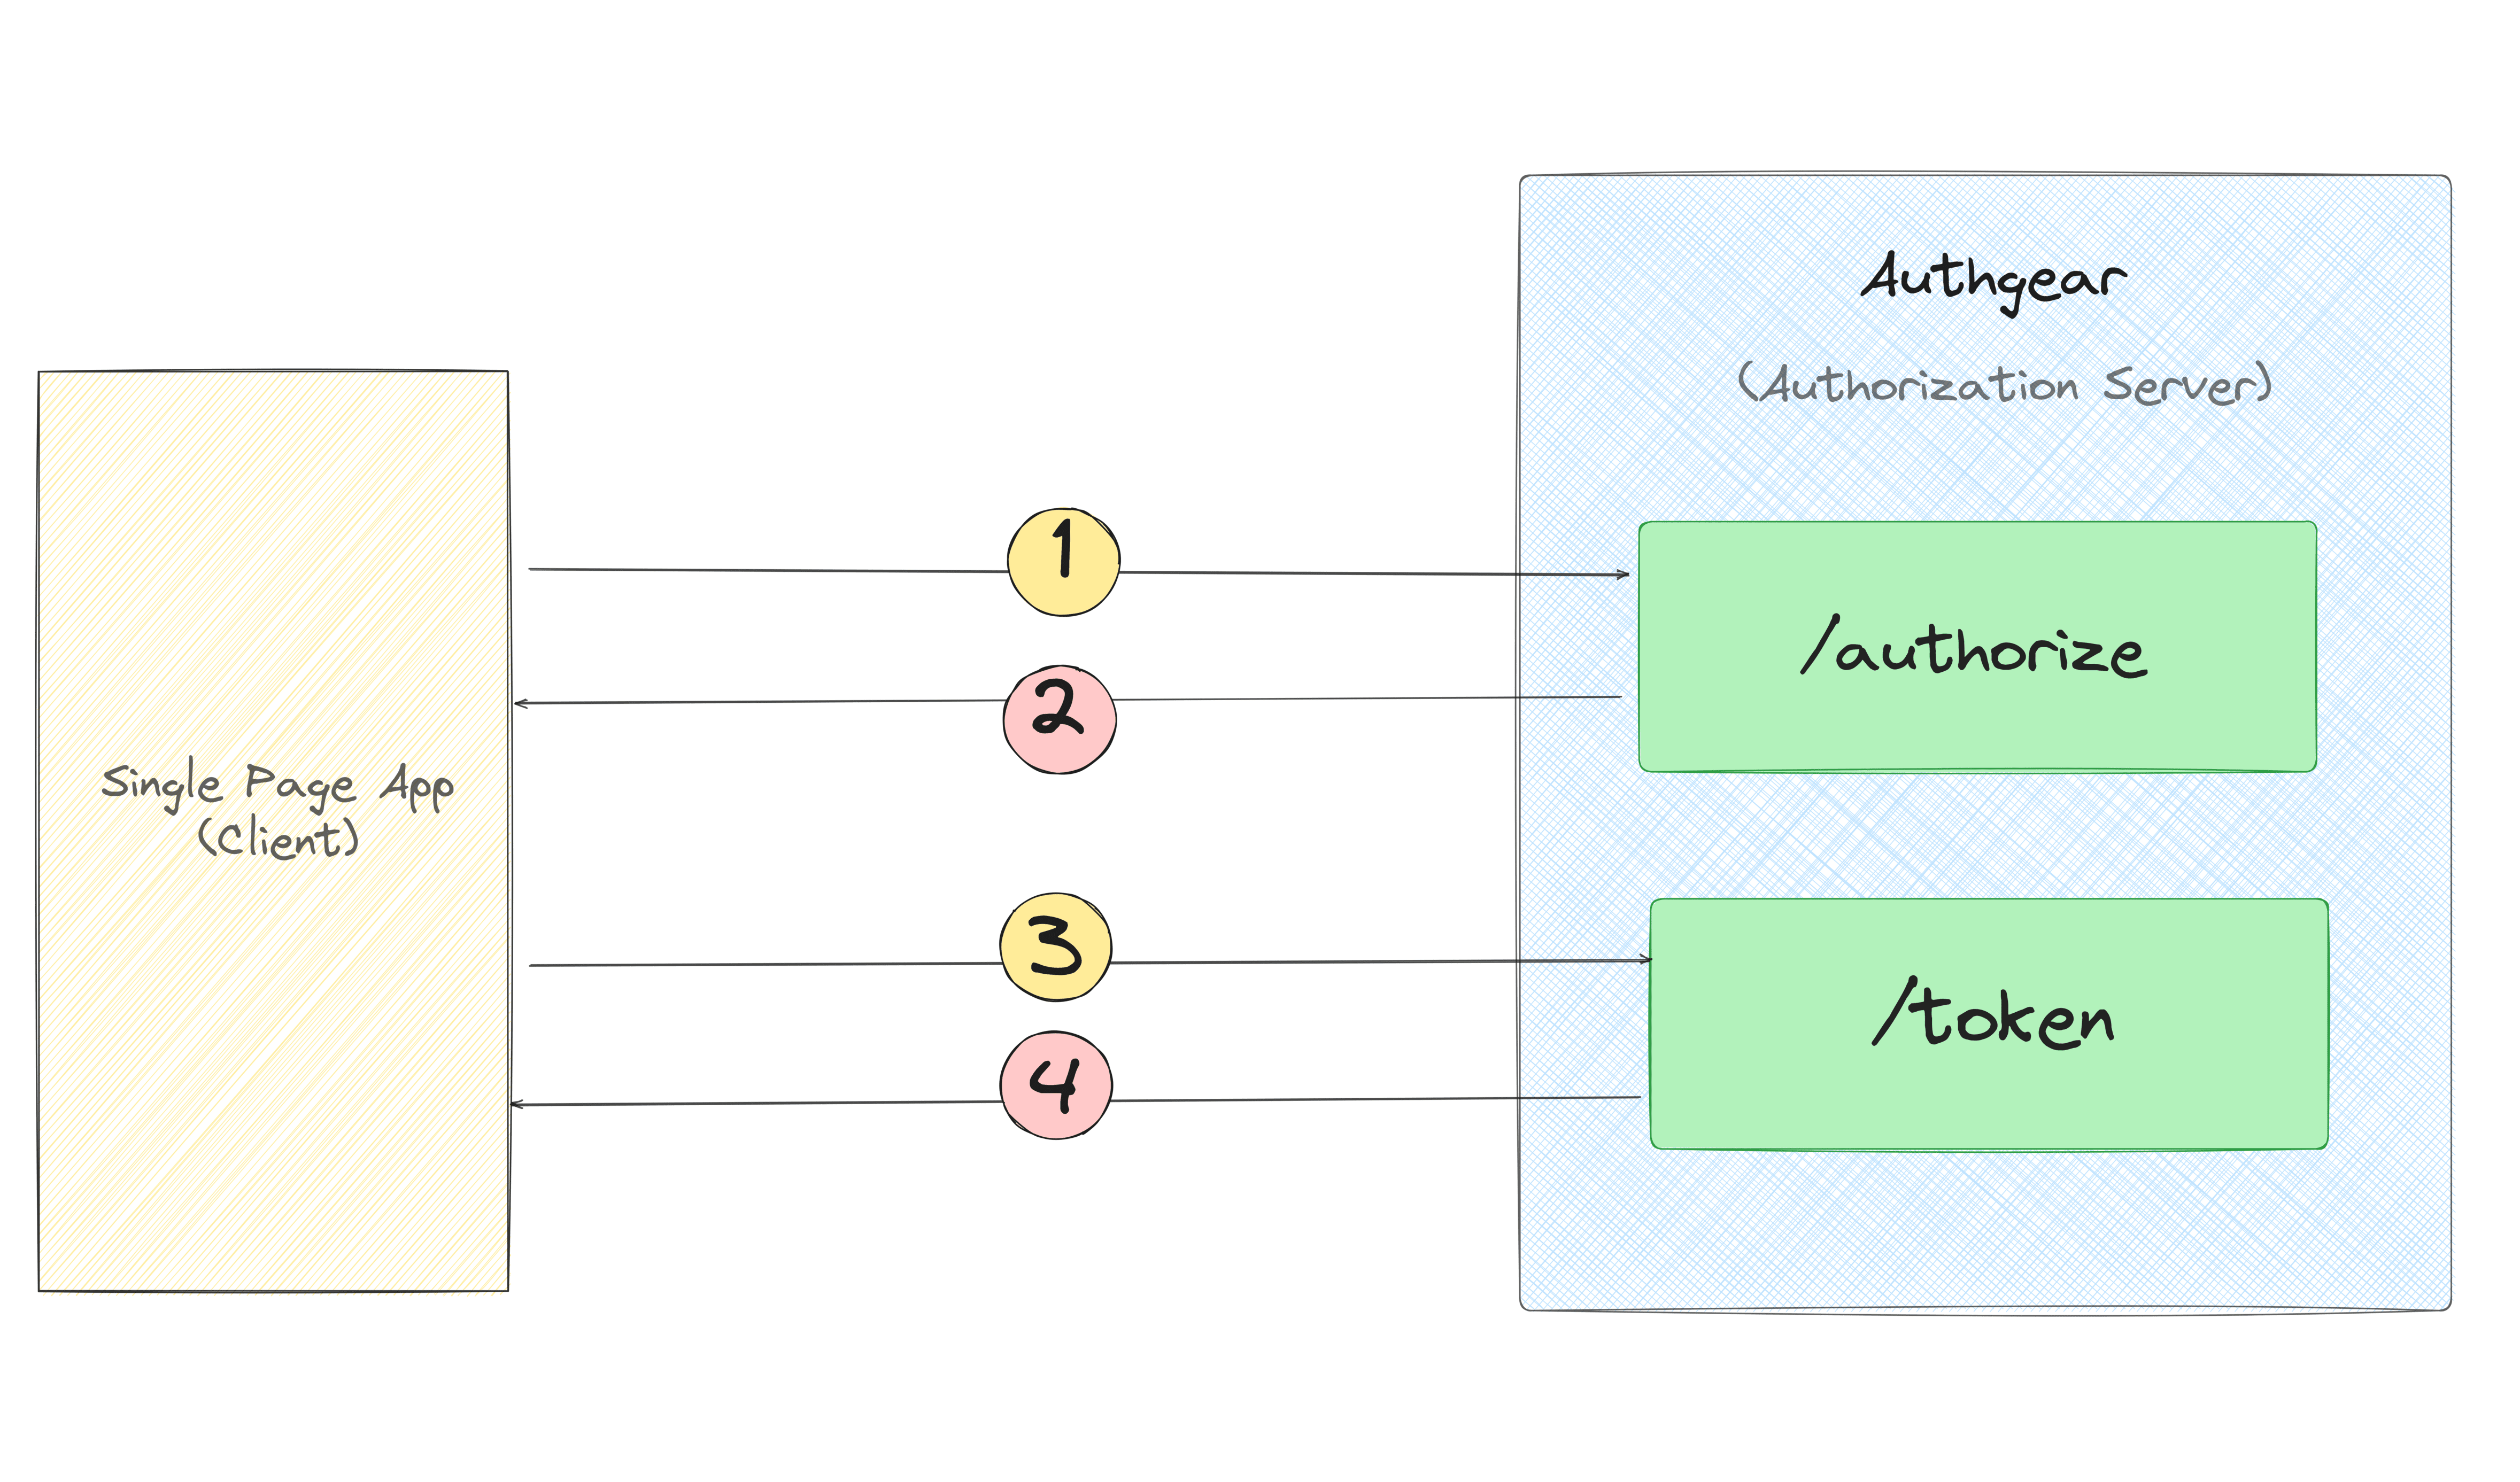
當您的使用者登入時,Authgear 會建立一個特殊的 ID 令牌,並將其發送回您的應用程式:
- 當使用者點擊客戶端應用程式中的「登入」按鈕或連結時,您的應用程式會將他們發送到 Authgear 登入頁面。您還可以 客製化 此頁。
- 使用者使用您設定的登入選項之一(例如使用者名稱/密碼、社群媒體登入、無密碼或電子郵件魔術連結)登入 Authgear。
- 使用者通過身份驗證後,您的應用程式會要求使用者提供 ID 令牌。
- 然後,Authgear 將使用者的 ID 令牌傳回給您的應用程式。
實施概述
SPA 應用程式的身份驗證實作由兩部分組成。在第一部分中,您建立 Authgear 應用程式、選擇日誌記錄方法並自訂登入 UI 頁面(可選)。第二部分涵蓋了使用 Authgear 的 Web SDK 觸發登入、登出等認證流程。
第 1 部分:配置 Authgear
建立 Authgear 帳戶
您需要做的第一件事是創建一個 Authgear帳戶 開始使用 Authgear 的門戶 免費。
在入口網站中建立應用程式
您需要建立一個應用程序,以便知道哪些使用者可以登入哪些應用程式。您可以在 Authgear 應用程式中設定您正在開發的專案的身份驗證工作方式。
- 一旦登入 Authgear 門戶,導航至“應用程式”標籤並點擊“新增應用程式”。
- 選擇適當的應用程式類型(單頁應用程式)並為您的應用程式提供名稱。
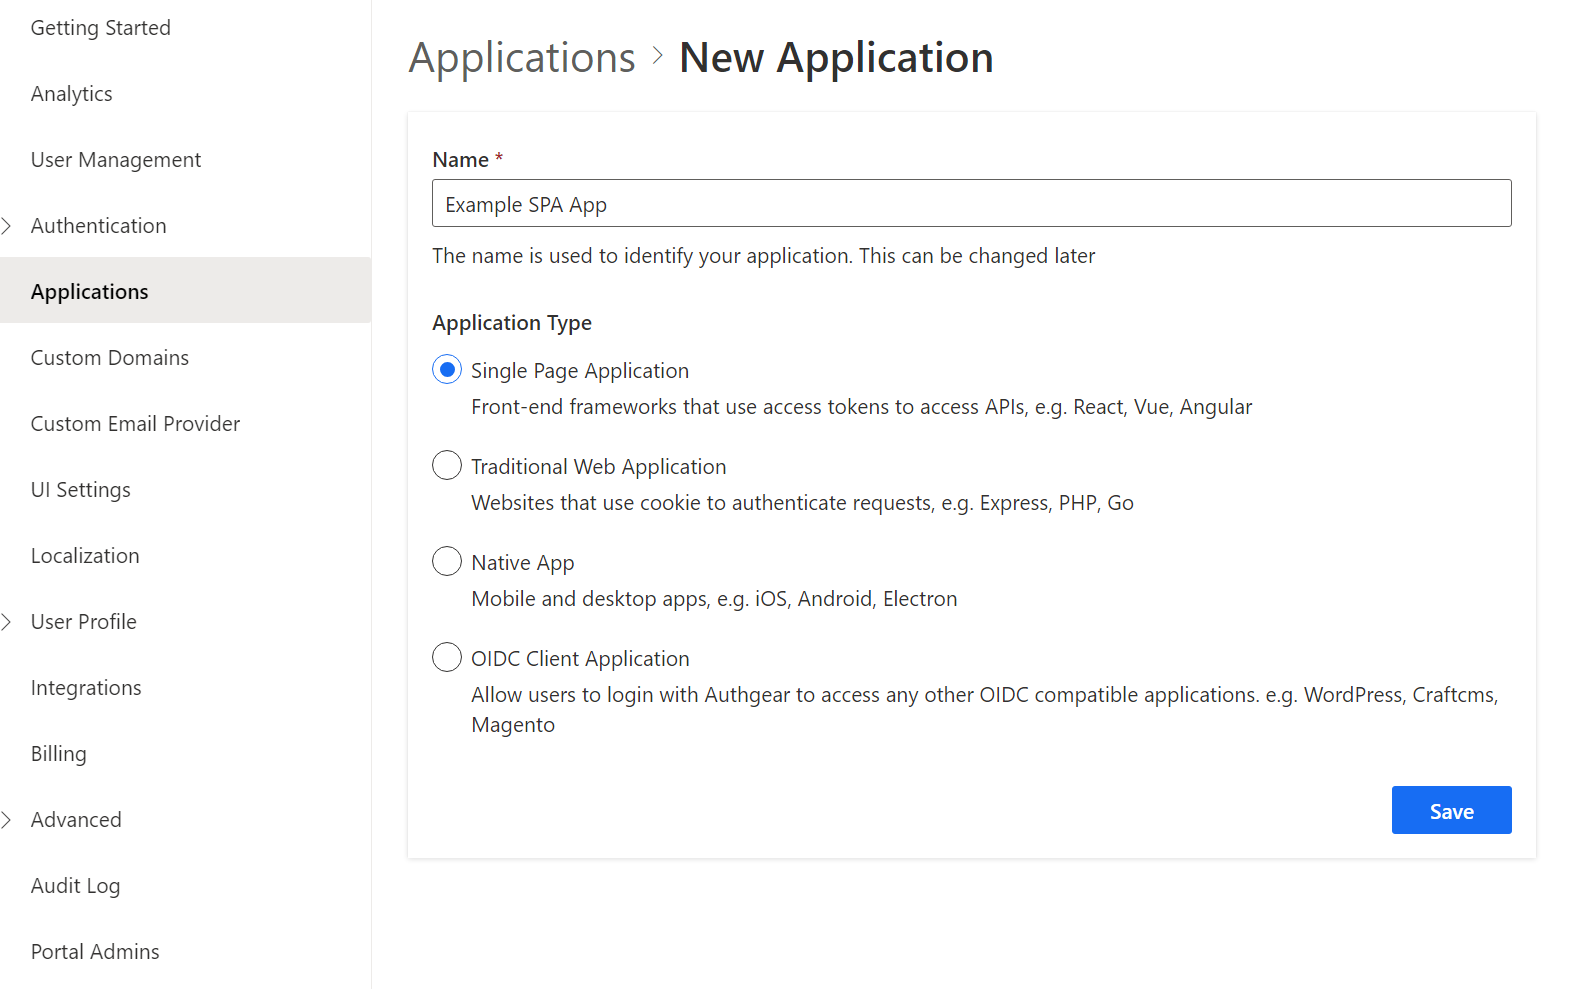
- 點擊“儲存”並跳到下一個教學頁面,或者您也可以按照 入門指南 設定新應用程式。
配置應用程式
建立應用程式後,您將被定向到「設定」選項卡,您可以在其中配置應用程式的設定。
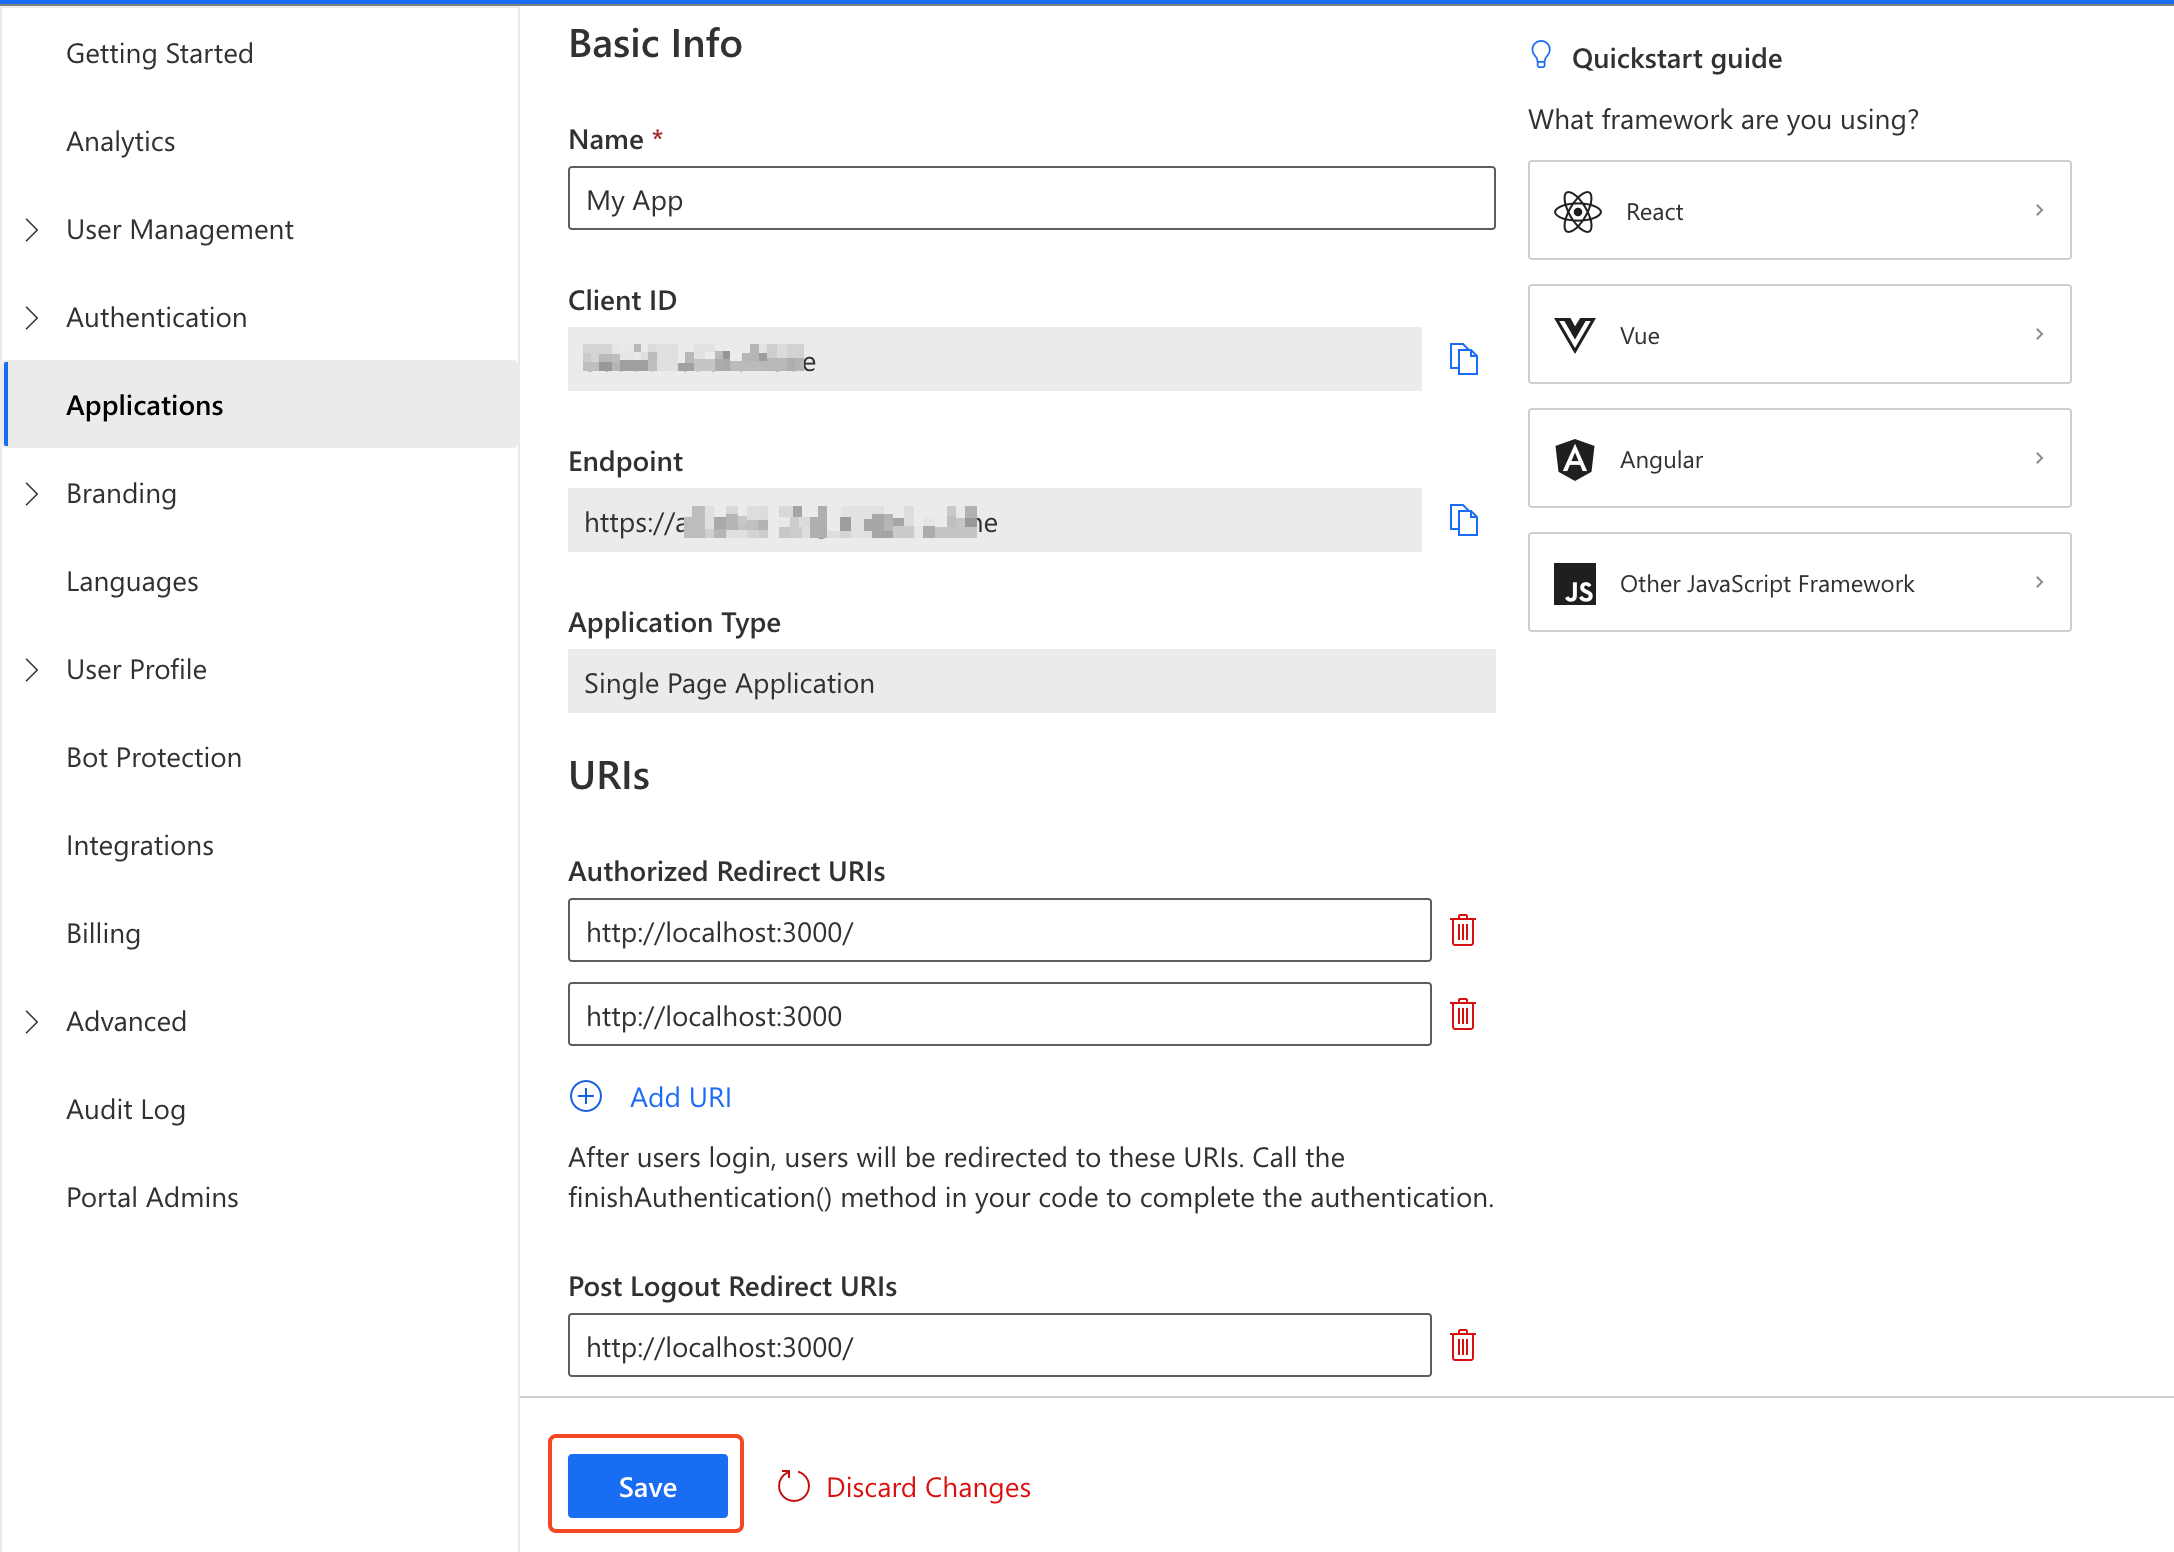
設定授權重定向 URI
授權重定向 URI 是應用程式中的 URL,Authgear 在使用者通過身份驗證後將其重定向到該 URL。你應該將其設置為 http://本地主機:3000/ 我們的 SPA 運作的地方。我們將在第 2 部分中創建它。
注意:必須包含上述 URL 中的尾隨「/」。
配置註銷後重定向 URI
登出後重定向 URI 是應用程式中的一個 URL,當使用者從 Authgear 授權伺服器登出後,Authgear 可以返回到該 URL。對於註銷URL,您需要設定相同的地址 http://本地主機:3000.
點擊“儲存”並記住 端點 和 客戶端 ID。透過初始化連接時您將需要它 Authgear Web SDK 在您的 SPA 代碼中。
Authgear 中的每個應用程式都指派一個字母數字的唯一用戶端 ID,您的應用程式程式碼將使用該 ID 透過 SDK 呼叫 Authgear API。
配置登入方法
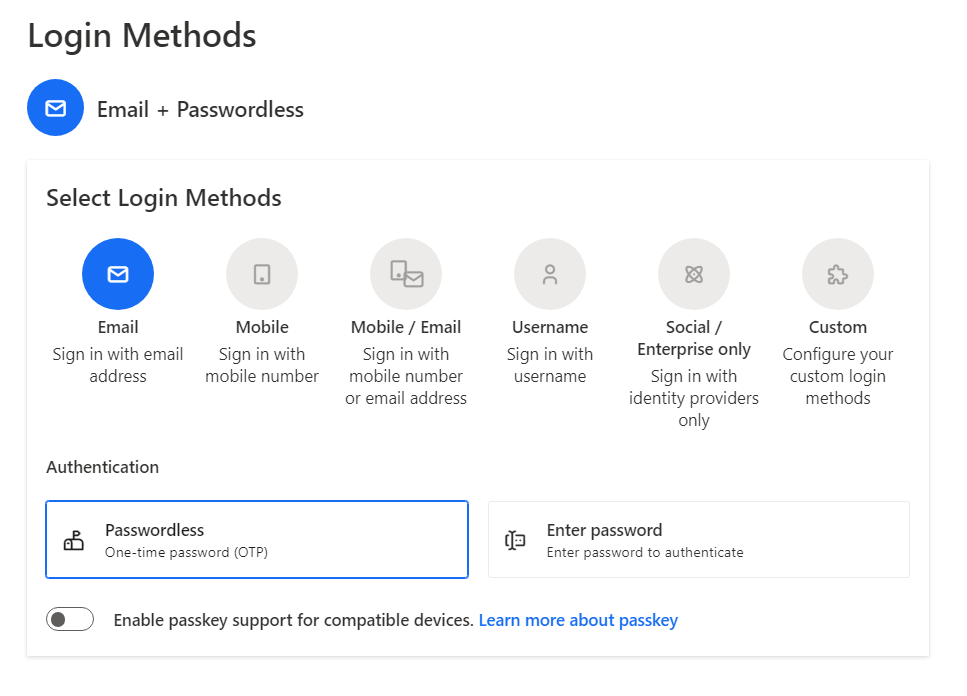
Authgear 支援多種身份驗證方法。從「身份驗證」標籤中,您可以為您的使用者選擇登入方法。選項包括透過電子郵件、行動裝置或社交媒體、僅使用使用者名稱或您指定的自訂方法。為簡單起見,您可以選擇 電子郵件 和 無密碼 選項:
第 2 部分:在您的網頁上新增身份驗證
按照步驟創建一個簡單的SPA應用程式並學習如何使用 Authgear 網路 SDK 將 Authgear 整合到您的應用程式中。您也可以查看 完整原始碼 在 GitHub 儲存庫上。
先決條件
在開始之前,請確保您的系統中安裝了 Node.js。如果沒有,請從以下位置下載並安裝 官方網站.
建立一個基本的網頁伺服器
在這一部分中,您將創建一個簡單的 網站伺服器 來託管 SPA 應用程式 ExpressJS。我們還將使用它來提供 HTML 頁面及其所需的任何資源,例如 JavaScript、CSS 等。首先在電腦上建立一個新資料夾來保存應用程式的原始程式碼(在範例中,我們將其稱為 authgear-spa-js-login)。然後,透過執行以下命令初始化新的 NPM 專案:
npm init -y
接下來我們安裝兩個必要的套件:
npm install express
同時安裝[節點監控器](https://npmjs.org/package/nodemon)這樣我們的伺服器就可以在開發模式下的任何程式碼變更時自動重新啟動:
npm install -D nodemon
接下來,打開 package.json 檔案並編輯腳本條目以具有如下所示的 start 和 dev 命令:
{
  // ...
  "scripts": {
    "start": "node server.js",
    "dev": "nodemon server.js"
  },
  // ...
}
現在您可以以兩種模式運行應用程式:生產模式和開發模式。
例如, npm run dev 將使用 nodemon 運行應用程序,在我們修改檔案時監視更改。
建立 server.js
在專案的根目錄中建立一個新檔案 server.js 並使用以下程式碼填充它:
const express = require("express");
const { join } = require("path");
const app = express();

// Serve static assets from the /public folder
app.use(express.static(join(__dirname, "public")));

// Endpoint to serve the configuration file
app.get("/authgear_config.json", (req, res) => {
  res.sendFile(join(__dirname, "authgear_config.json"));
});

// Serve the index page for all other requests
app.get("/*", (_, res) => {
  res.sendFile(join(__dirname, "index.html"));
});

// Listen on port 3000
app.listen(3000, () => console.log("Application running on port 3000"));
建立一個基本的 HTML 頁面
在專案根目錄下建立一個index.html文件,並在建立的文件中加入以下內容:
<!DOCTYPE html>
<html>
<head>
<meta charset="UTF-8" />
<title>Authgear SPA SDK Sample</title>
<link rel="stylesheet" type="text/css" href="/zh-hant/css/main.css" />
</head>
<body>
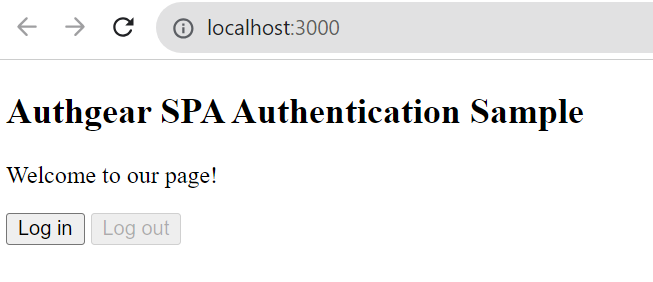
<h2>SPA Authentication Sample</h2>
<p>Welcome to our page!</p>
<button id="btn-login" disabled="true" onclick="login()">Log in</button>
<button id="btn-logout" disabled="true" onclick="logout()">Log out</button>
<button id="btn-settings" disabled="true" onclick="openUserSettings()">User Settings</button>
<script src="js/app.js"></script>
<script src="https://unpkg.com/@authgear/web@2.2.0/dist/authgear-web.iife.js"></script>
</body>
</html>
To keep the demo simple, we do not use a package manager such as Webpack, we will retrieve the Authgear Web SDK from Authgear’s CDN using IIFE(Immediately-invoked Function Expression) bundle. We can reference a script in our HTML directly:
<script src="https://unpkg.com/@authgear/web@2.2.0/dist/authgear-web.iife.js"></script>
You can install the Authgear Web SDK as a dependency of your application, it is useful if you are building React or React Native apps. See how to install the package.
Create a main.css file
Create a new folder called public folder in the project root folder and create another folder called css inside the public folder. Add a new file in there called main.css. This will be used to determine how the log-in and log-out button elements will be hidden on the main page depending on whether a user is authenticated or not.
Open the newly-created public/css/main.css file and add the following CSS:
.hidden {
    display: none;
}

label {
    margin-bottom: 10px;
    display: block;
}
After creating an HTML file and applying CSS styles, see now how our page looks like by running npm run dev and accessing it at http://localhost:3000.
Create an app.js file
To add some action to the page, we create a new directory in the public folder called js, and add a new file in there called app.js.
Copy and paste the following JS code to app.js:
    	let authgearClient = null;

      const configureClient = async () => {
          authgearClient = window.authgear.default;

          await authgearClient.configure({
              endpoint: "YOUR_AUTHGEAR_PROJECT_DOMAIN",
              clientID: "YOUR_AUTHGEAR_APP_CLIENT_ID",
              sessionType: "refresh_token",
          }).then(
              () => {
                  console.log("Authgear client successfully configured!");
              },
              (err) => {
                  console.log("Failed to configure Authgear");
              }
          );
      };

      const login = async () => {
          await authgearClient
              .startAuthentication({
                  redirectURI: "http://localhost:3000/",
                  prompt: "login",
              })
              .then(
                  () => {
                      console.log("Logged in!");
                  },
                  (err) => {
                      console.log("Log in failed", err);
                  }
              );
      };

      const logout = async () => {
          await authgearClient
          .logout({
            redirectURI: window.location.origin,
          })
          .then(
            () => {
              console.log("Logged out successfully");
            },
            (err) => {
              console.log("Failed to logout");
            }
          );

          updateUI();
      };

      const openUserSettings = () => {
          authgearClient.open("/settings");
      }

      window.onload = async () => {
          await configureClient();
          updateUI();

          const query = window.location.search;
          if (query.includes("code=")) {
              await authgearClient.finishAuthentication();
              updateUI();

              window.history.replaceState({}, document.title, "/");
          }
      }

      const updateUI = async () => {
          const isAuthenticated = authgearClient.sessionState === "AUTHENTICATED";

          document.getElementById("btn-logout").disabled = !isAuthenticated;
          document.getElementById("btn-login").disabled = isAuthenticated;
          document.getElementById("btn-settings").disabled = !isAuthenticated;
      };
Replace AUTHGEAR_ENDPOINT and CLIENT_ID with the endpoint and client ID for your Authgear client application.
The code above configures a new Authgear client, and defines login and logout logic.
Understanding the whole picture
Let’s breakdown down app.js code in the previous section and understand how authentication is achieved with Authgear:
Login flow
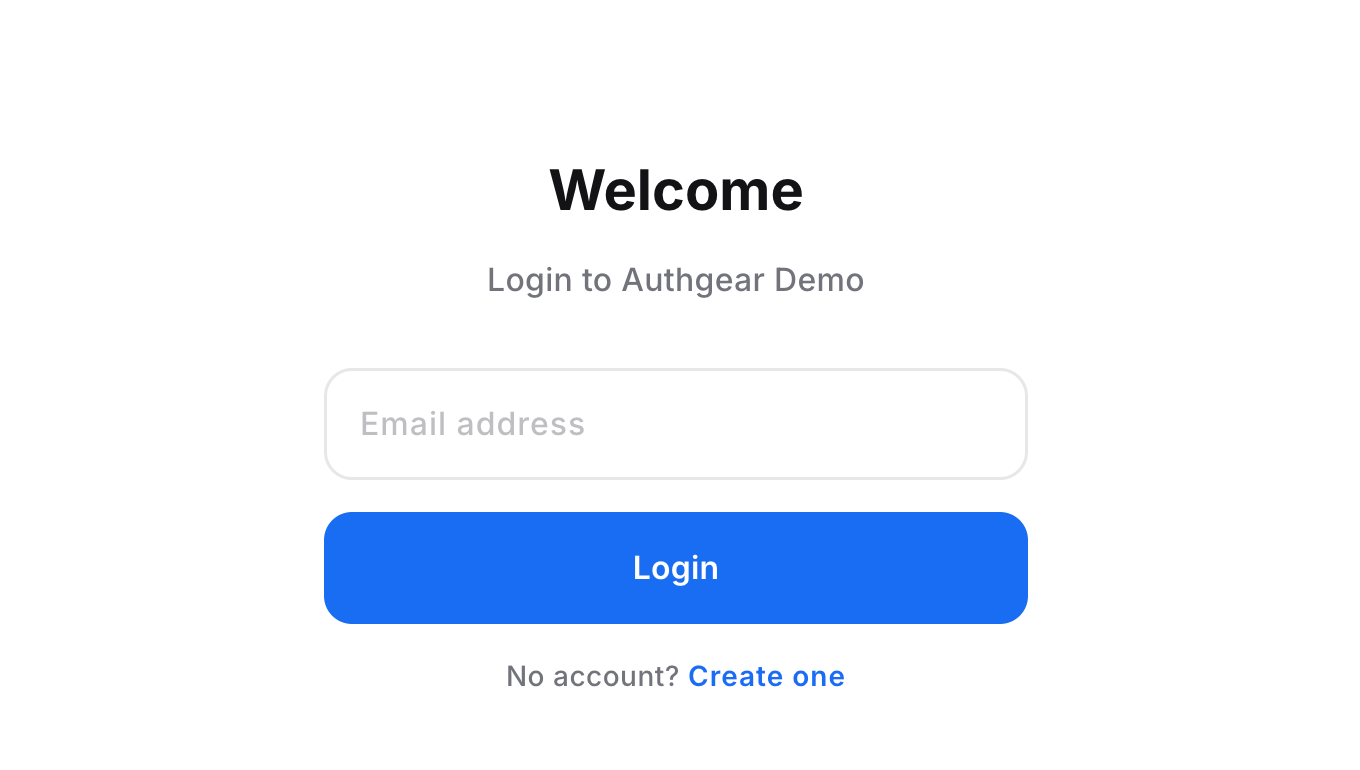
login: The login function is called by the Login button previously defined in the HTML page. It performs the login action by calling authgearClient.startAuthentication Authgear’s function. It redirects the user to the Auhthgear login page. After the user logs in successfully, they will be redirected back to the same page we set in redirectURI. Run the project and click the Login button. You should be taken to the Authgear Login Page configured for your application. Go ahead and create a new user or log in using an email (we specified the Passwordless Email login method in the first part). When you try to log in with your email, you should receive a magic link to your email box to confirm login operation.
After authenticating successfully, you will be redirected to the page you were before.
Logout flow
logout: This function logs the user out and redirects them back to the original page (at http://localhost:3000). It uses Authgear’s logout function and logs a message to the console indicating the result of the operation.
Update the UI
window.onload: This is a function that runs when the page loads. It configures the Authgear client and updates the UI. If the page’s URL contains a “code=” which means the user is authenticated (code query will be received from Authgear server), it updates the UI again and removes the “code=” from the URL.
Evaluate the authentication state
updateUI: This function updates the status of the login and logout buttons based on whether the user is authenticated or not. In Authgear, you can check if the user has logged in or not with sessionState attribute. If the user is authenticated, we disable the login button and enable the logout button, and vice versa if the user is not authenticated.
User Settings page
Authgear provides a pre-built User Settings page for your users to view and modify their profile details and security settings.
The openUserSettings() function in our example app call open(‘/settings’) method of the Authgear SDK to open the User Settings page when a user clicks on the User Settings button.
Summary
Throughout the post, you learned how you can quickly add passwordless email-based authentication to any JavaScript web page in just 10 minutes using Authgear. There’s much more you can do with Authgear, for example, you can obtain the current user info through SDK, or if you needed to securely communicate from your web page to a backend API, you can include an access token to the HTTP requests to your application server.