Engineering
Supabase Auth vs Authgear for Next.js: Which Should You Choose?
March 27, 2026
Use your existing SSO or IdP with Supabase. Learn how to exchange JWTs for full RLS access and single sign-on integration.

You already have sign-in solved. Your company is using an identity provider (IdP) for SSO, and every app in your stack already trusts them. Then a new project comes along, and your team wants to try out Supabase.
There’s just one catch: your users live outside Supabase Auth, and Supabase’s built-in third-party options (Clerk, WorkOS, Auth0, Amazon Cognito) don’t fit your setup. You’re not migrating users, and you definitely don’t want two sources of truth.
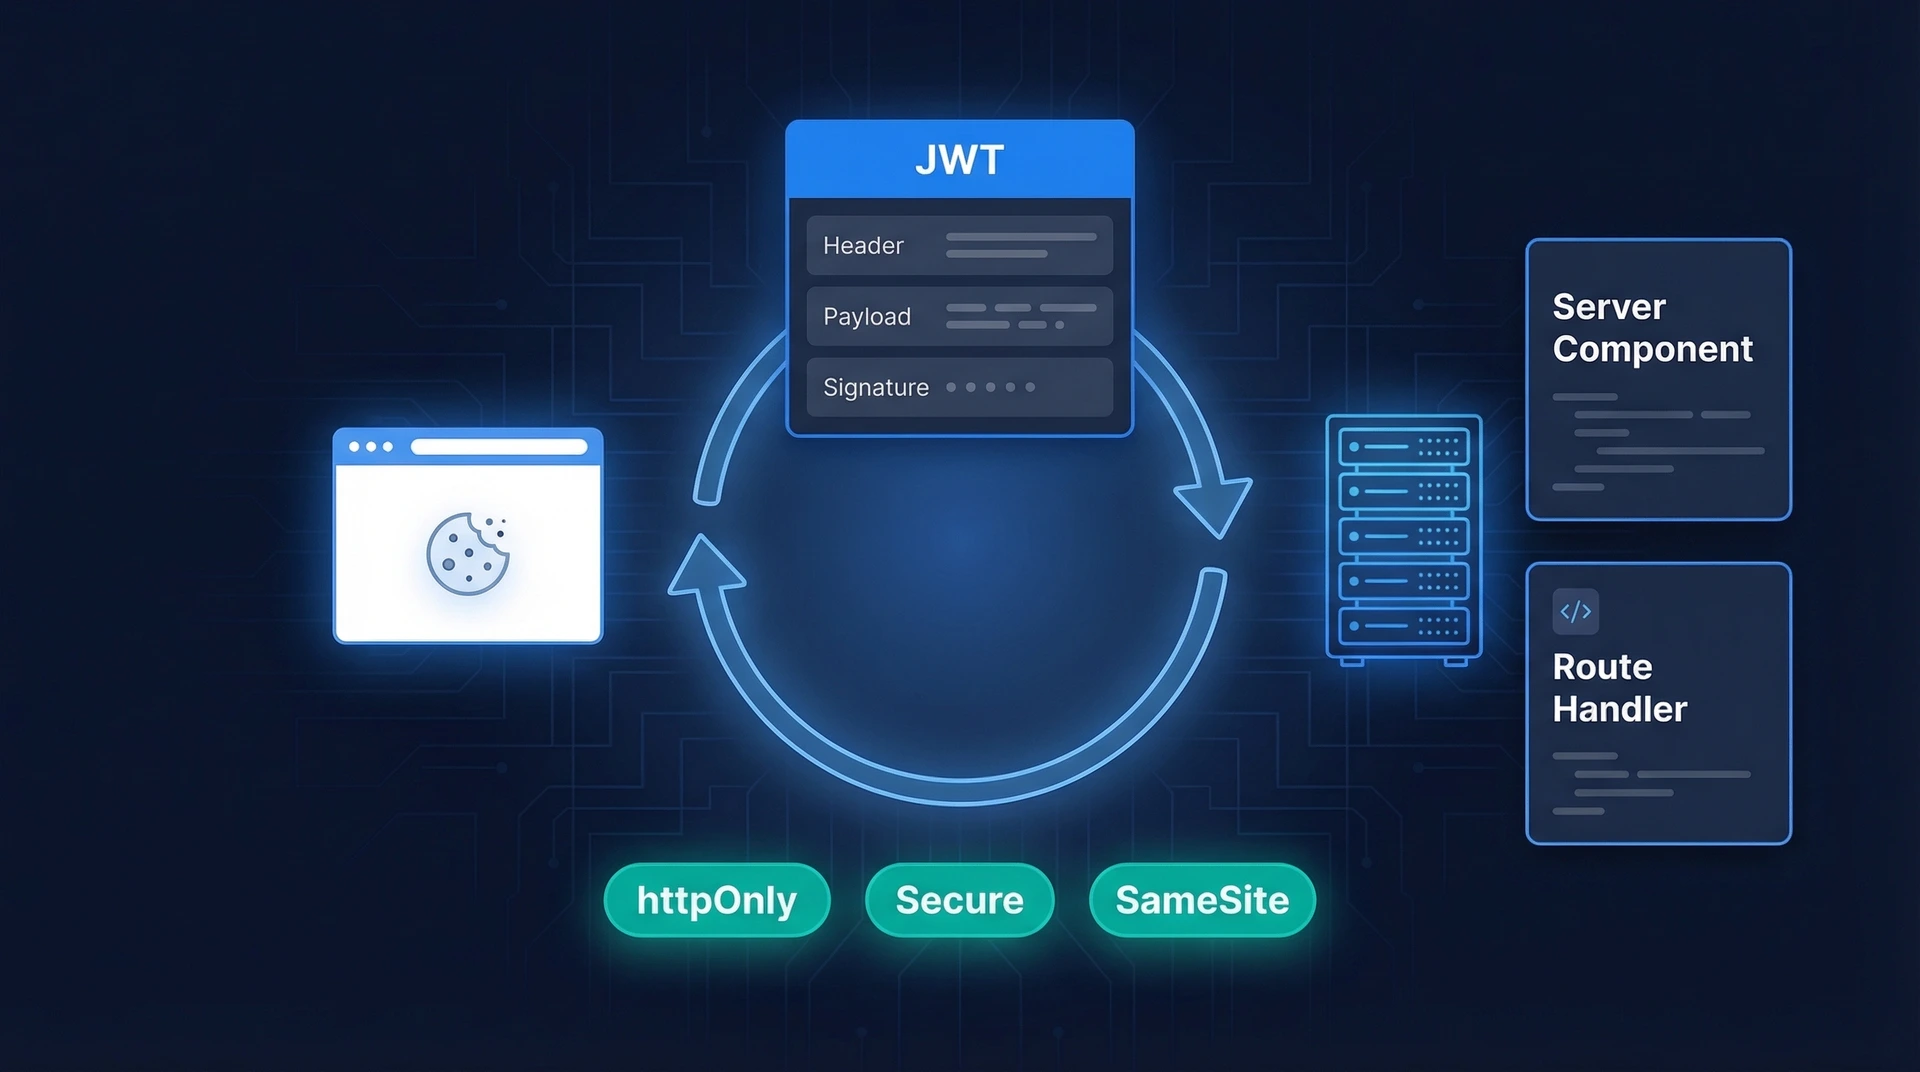
The good news? You don’t need to. Supabase’s database doesn’t require Supabase Auth, it only needs a Supabase-signed JWT to evaluate Row Level Security (RLS). If you can verify your existing JWTs, you can exchange them for a Supabase-signed token at the edge and keep using your current SSO or IdP exactly as-is. No user imports. No duplicate sessions.
In this guide, you’ll learn how to:
supabase-js to fetch that token on demand.sub claim.If you don’t already have an IdP, Authgear slots in neatly here and gives you MFA, biometrics, social logins. But the pattern works with any JWT issuer. Let’s get your existing SSO talking to Supabase the right way.

This guide is for teams who can't use these options—you can still use Supabase.
The full example app source code is available on GitHub: https://github.com/authgear/authgear-example-supabase
Use it as a template for integrating your own JWT-based IdP with Supabase.
Supabase’s Postgres RLS expects requests to carry a Supabase-signed JWT and typically the authenticated role. If you already have an SSO/IdP that issues JWTs, you can’t hand those tokens directly to Supabase. The solution is a bring-your-own-JWT flow:
role: "authenticated".Check the payload of the JWT issued by your existing auth provider. It typically contains claims like sub , email , phone_number.
Also check how to verify the token. Typically it's via a JWKs endpoint under https://<your-idp>/.well-known/openid-configuration.
See Authgear's JWT Token for reference.
Next we will implement a server-side function that handles the token exchange. One of ways is to deploy a Supabase Edge Function.
In the Supabase dashboard:Project Settings → API → JWT Keys → Legacy JWT SecretCopy the secret value—you’ll need it for signing the Supabase token.
Now we set up the critical piece: a Supabase Edge Function that will accept your IdP's JWT and return a new JWT signed with Supabase’s secret.
Here we use Authgear as an example, but it's similar for other IdP that issues JWT.
AUTHGEAR_ENDPOINT = your Authgear app endpoint (e.g. https://myapp.authgear.cloud).SB_JWT_SECRET = your Supabase JWT secret (from Step 2 above).exchange-jwt.import "jsr:@supabase/functions-js/edge-runtime.d.ts"
import jwt from "npm:jsonwebtoken";
import jwks from "npm:jwks-rsa";
import * as jose from "https://deno.land/x/jose@v4.14.4/index.ts";
// CORS headers for cross-origin requests
const corsHeaders = {
"Access-Control-Allow-Origin": "*",
"Access-Control-Allow-Headers": "Authorization, Content-Type",
"Access-Control-Allow-Methods": "GET",
"Access-Control-Max-Age": "3600"
};
// Read environment variables
const authgearEndpoint = Deno.env.get("AUTHGEAR_ENDPOINT");
const supabaseJwtSecret = Deno.env.get("SB_JWT_SECRET");
if (!authgearEndpoint || !supabaseJwtSecret) throw new Error("Missing env vars");
// Get JWKS URI from Authgear's OpenID configuration
async function getJwksUri(): Promise<string> {
const configUrl = `${authgearEndpoint}/.well-known/openid-configuration`;
const response = await fetch(configUrl);
const config = await response.json();
return config.jwks_uri;
}
// Extract Bearer token from Authorization header
function extractToken(req: Request): string | null {
const authHeader = req.headers.get("Authorization");
if (!authHeader) return null;
const parts = authHeader.split(" ");
if (parts.length !== 2 || parts[0] !== "Bearer") return null;
return parts[1];
}
// Verify JWT token with Authgear's public key
async function verifyToken(token: string): Promise<any> {
// Decode token to get key ID
const decoded = jwt.decode(token, { complete: true }) as any;
if (!decoded?.header?.kid) {
throw new Error("Invalid token: missing key ID");
}
// Get JWKS URI and create JWKS client
const jwksUri = await getJwksUri();
const jwksClient = jwks({ jwksUri });
// Get the signing key
const key = await jwksClient.getSigningKey(decoded.header.kid);
const signingKey = key.getPublicKey();
// Verify the token
const options = {
algorithms: ["RS256"],
issuer: authgearEndpoint,
};
return jwt.verify(token, signingKey, options);
}
// Sign a new JWT with Supabase secret
async function signSupabaseJwt(payload: any): Promise<string> {
payload.role = "authenticated"; // Required by Supabase
// Add or modify any other claims you need for RLS policies
// payload.some_claim = "some claim";
// Sign with Supabase JWT secret
const supabaseSecret = new TextEncoder().encode(supabaseJwtSecret);
const supabaseJwt = await new jose.SignJWT(payload)
.setProtectedHeader({ alg: "HS256", typ: "JWT" })
.setIssuer("supabase")
.setIssuedAt(payload.iat)
.setExpirationTime(payload.exp || "")
.sign(supabaseSecret);
return supabaseJwt;
}
// Main function handler
Deno.serve(async (req: Request) => {
// Handle CORS preflight requests
if (req.method === "OPTIONS") {
return new Response("ok", { headers: corsHeaders });
}
try {
// Extract token from request
const token = extractToken(req);
if (!token) {
return new Response(
JSON.stringify({ error: "Missing or invalid Authorization header" }),
{
headers: { ...corsHeaders, "Content-Type": "application/json" },
status: 401
}
);
}
// Verify the token
const verified = await verifyToken(token);
// Sign a new JWT with Supabase secret
const supabaseJwt = await signSupabaseJwt(verified);
return new Response(
JSON.stringify({ supabaseJwt }),
{
headers: { ...corsHeaders, "Content-Type": "application/json" },
status: 200,
}
);
} catch (error) {
console.error("Token verification failed:", error.message);
return new Response(
JSON.stringify({ error: "Token verification failed" }),
{
headers: { ...corsHeaders, "Content-Type": "application/json" },
status: 401,
}
);
}
});
Once deployed, your function is accessible at:
${SUPABASE_URL}/functions/v1/exchange-jwt
Now let’s set up the database table and RLS rules in Supabase. We’ll create a table to store data owned by users, and use RLS to ensure each user can only manipulate their own rows.
Open the SQL editor in your Supabase project and run the following SQL commands:
-- 1. Helper function to get the current Authgear user ID from the JWT
CREATE OR REPLACE FUNCTION current_user_id()
RETURNS TEXT AS $$
  SELECT auth.jwt() ->> 'sub';
$$ LANGUAGE SQL STABLE;
We created a SQL function current_user_id() that returns the JWT’s sub claim (subject) from the current request’s JWT. Supabase’s Postgres has an auth.jwt() function that exposes the JWT claims of the requester; auth.jwt() ->> 'sub' extracts the sub field as text.
-- 2. Example Table (storing instruments owned by a user_id)
CREATE TABLE instruments (
  id BIGSERIAL PRIMARY KEY,
  created_at TIMESTAMPTZ DEFAULT NOW() NOT NULL,
  name TEXT NOT NULL,
  user_id TEXT NOT NULL   -- store Authgear user’s ID (sub)
);

-- 3. Enable Row Level Security on the table
ALTER TABLE instruments ENABLE ROW LEVEL SECURITY;

-- 4. RLS Policies:
-- Allow each authenticated user to SELECT rows where user_id = their own ID
CREATE POLICY "Users can read their own instruments"
ON instruments
FOR SELECT
TO authenticated
USING (user_id = current_user_id());
instruments table has a user_id column which will store the Authgear user’s ID for each instrument.We then defined a policy for READ operations, you can create similar policies for INSERT, UPDATE & DELETE. Each policy is limited to the authenticated role and uses a condition requiring that the row’s user_id matches the user’s id from the JWT.
Now you can use the exchanged JWT in the subsequent requests to Supabase. The Supabase client expose an accessToken hook for custom access token function.
If you’re using Authgear on the frontend, it looks like this (swap to your IdP SDK as needed):
import { createClient } from '@supabase/supabase-js';
import authgear from '@authgear/web';

const SUPABASE_URL = import.meta.env.VITE_SUPABASE_URL;
const SUPABASE_ANON_KEY = import.meta.env.VITE_SUPABASE_PUBLISHABLE_KEY;

// Optional: caches to avoid redundant token exchanges
let cachedSupabaseJwt = null;
let cachedAuthgearToken = null;

// Function to exchange Authgear token for Supabase token
async function exchangeToken(authgearToken) {
  // Return cached token if the Authgear token hasn’t changed
  if (cachedAuthgearToken === authgearToken && cachedSupabaseJwt) {
    return cachedSupabaseJwt;
  }
  // Call the Supabase Edge Function
  const res = await fetch(`${SUPABASE_URL}/functions/v1/exchange-jwt`, {
    headers: { Authorization: `Bearer ${authgearToken}` }
  });
  if (!res.ok) {
    throw new Error(`Token exchange failed with status ${res.status}`);
  }
  const { supabaseJwt } = await res.json();
  // Update cache and return the new JWT
  cachedAuthgearToken = authgearToken;
  cachedSupabaseJwt = supabaseJwt;
  return supabaseJwt;
}

// Create Supabase client with custom auth settings
export const supabase = createClient(SUPABASE_URL, SUPABASE_ANON_KEY, {
  auth: {
    autoRefreshToken: false,   // Don't use Supabase’s token refresh
    persistSession: false,     // Don't store Supabase session (Authgear will handle session)
  },
  accessToken: async () => {
    // This function runs before every Supabase request that needs auth
    await authgear.refreshAccessTokenIfNeeded();
    const authgearToken = authgear.accessToken;
    if (!authgearToken) return null;
    // Exchange Authgear token for a Supabase token:contentReference[oaicite:12]{index=12}:contentReference[oaicite:13]{index=13}
    return exchangeToken(authgearToken);
  },
});
In this configuration:
autoRefreshToken and persistSession in Supabase’s client so that Authgear is the source of truth for the session.accessToken async function. The Supabase Client will call this function every time it needs a JWT for an authenticated request. In our case, that is every query to our instruments table.Now the database should be accesible using the Supabase client and secured by the RLS policy.
// Read
const { data, error } = await supabase.from("instruments").select("*");

// Insert
await supabase.from("instruments").insert({
  name: "New instrument",
  user_id: userInfo.sub, // match your RLS
});
You don’t have to choose between Supabase and your existing SSO. By verifying your IdP’s JWT and minting a Supabase-signed token at the edge, you get clean RLS, a single source of identity, and zero user migration. It’s the simplest way to bring Supabase into a stack that already trusts JWTs. So you can keep using all the features provided by your auth provider, such as Authgear.
Privacy is important to us, so you have the option of disabling certain types of storage that may not be necessary for the basic functioning of the website. Blocking categories may impact your experience on the website.