Engineering
Next.js API Route Authentication: How to Secure Your Endpoints
March 26, 2026
API routes in Next.js work differently from page protection — Route Handlers must return HTTP status codes, not redirects. This guide covers session cookies, Bearer tokens, RBAC, and Server Actions with complete TypeScript examples.

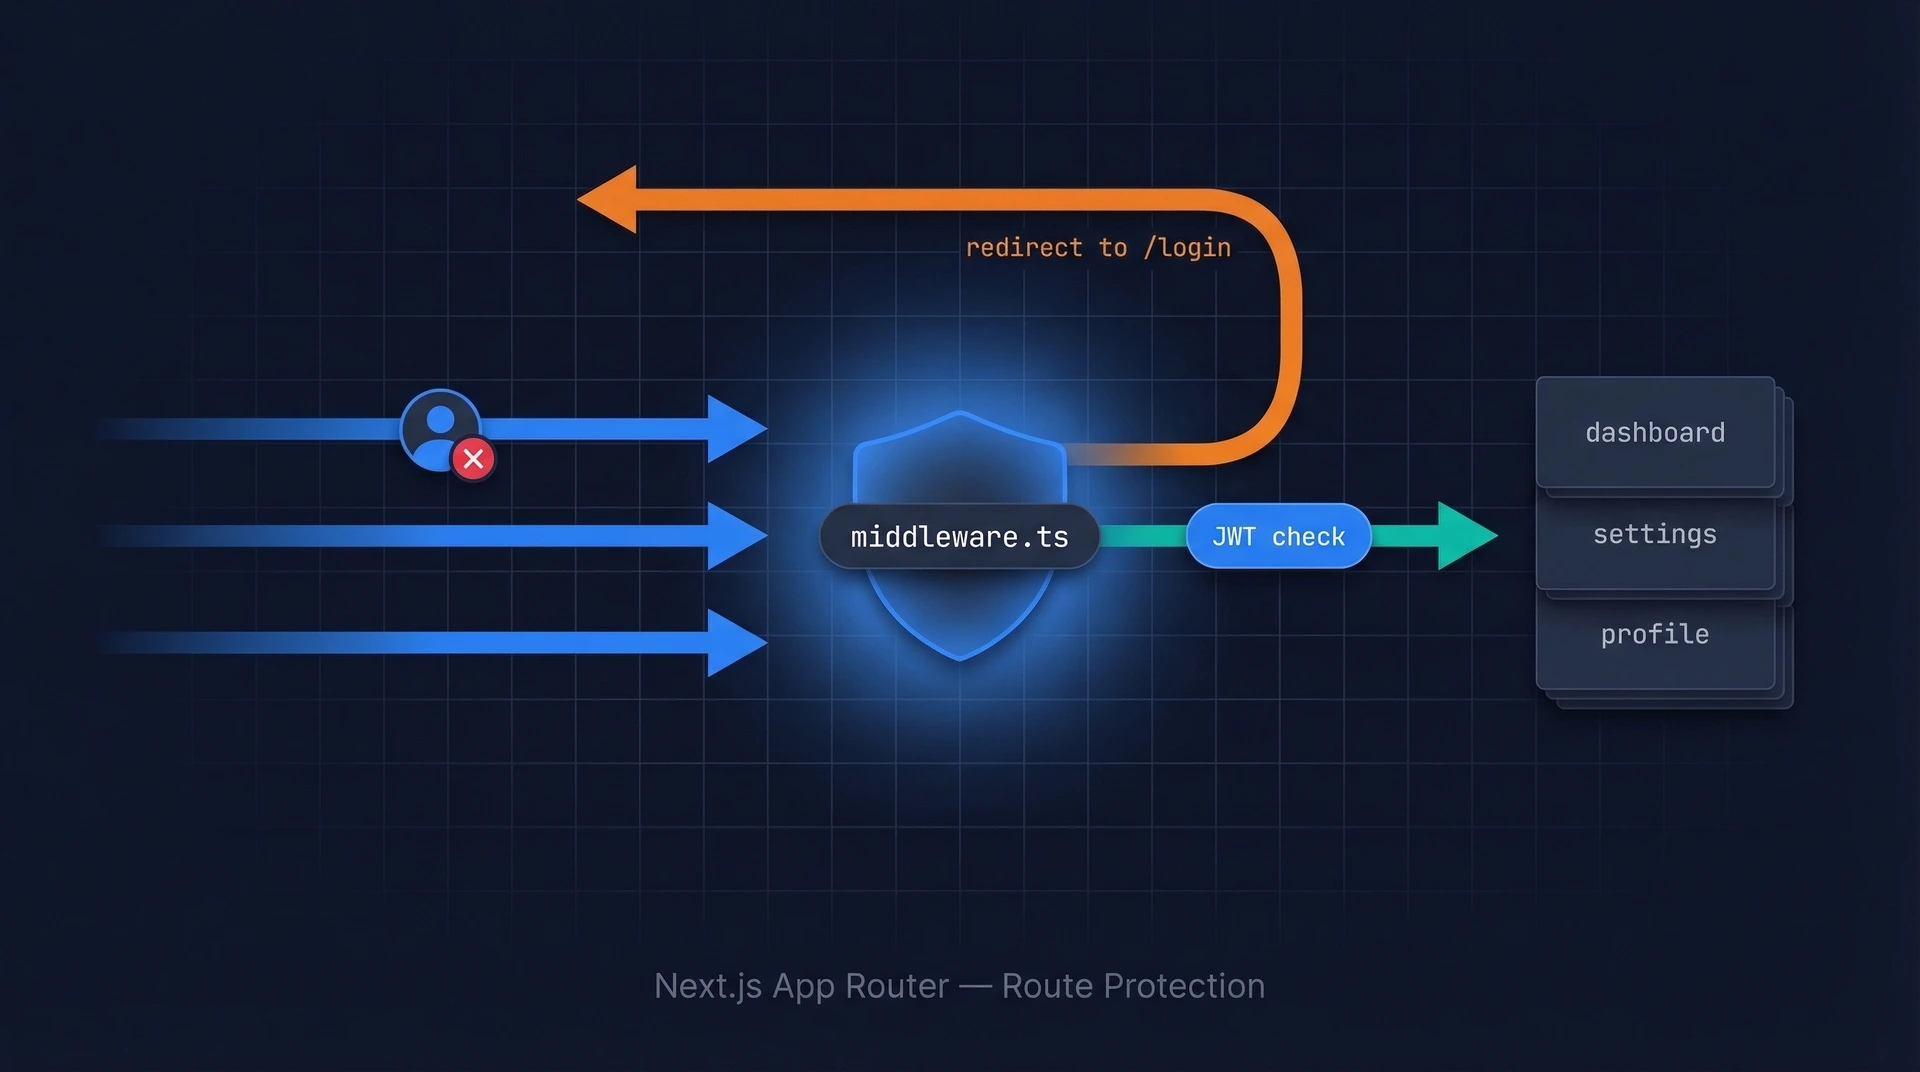
When you protect a page in Next.js, you check the user's session and redirect unauthenticated visitors to a login screen. API routes work differently.
A Route Handler is an endpoint, not a page. Its caller might be a mobile app, a JavaScript fetch() call, or an automated script — none of which can follow a 302 Found redirect. Instead, your Route Handler must return a proper HTTP status code:
This distinction matters for API clients. A browser can follow a redirect; a mobile SDK needs a clear status code so it knows whether to prompt for login or display an "access denied" message.
There's a second important difference: middleware alone is not enough. We'll cover that in the Common Mistakes section.
If you're new to Next.js authentication in general, read the Next.js Authentication Guide first, then return here for API-specific patterns.
Next.js 13 introduced the App Router, which replaced the pages/api/ directory with Route Handlers. Instead of creating pages/api/users.ts, you now create app/api/users/route.ts.
The file exports named HTTP method functions (GET, POST, PUT, DELETE, etc.) using the standard Web Request and Response APIs:
// app/api/users/route.ts
export async function GET(request: Request) {
  return Response.json({ message: "Hello from Route Handler" });
}
Key differences from pages/api:
Request/Response objects — not the older Node.js req/res pattern.next/headers (more on this below).app/, not just under app/api/.If you're migrating an existing pages/api route, the logic is the same — just swap the function signature and response style.
Route Handlers need to read credentials from the incoming request. There are two common patterns.
A session cookie is like a wristband at a concert venue: the server issued it at login, and every subsequent request carries it automatically. In a Route Handler, use Next.js's cookies() helper (async since Next.js 15):
import { cookies } from "next/headers";

export async function GET(request: Request) {
  const cookieStore = await cookies();
  const sessionToken = cookieStore.get("session")?.value;

  if (!sessionToken) {
    return Response.json({ error: "Unauthenticated" }, { status: 401 });
  }

  // validate sessionToken with your auth provider...
}
For machine-to-machine calls — mobile apps, other backend services — the caller typically passes a JWT in the Authorization header:
export async function GET(request: Request) {
  const authHeader = request.headers.get("Authorization");

  if (!authHeader || !authHeader.startsWith("Bearer ")) {
    return Response.json({ error: "Missing or malformed token" }, { status: 401 });
  }

  const token = authHeader.slice(7); // strip "Bearer " prefix
  // validate token with your auth provider...
}
Which pattern should you use? Session cookies are the right choice for browser-based apps — the browser sends them automatically and you avoid client-side token storage. Bearer tokens are better for APIs consumed by non-browser clients. Authgear supports both approaches, and we'll show you how below.
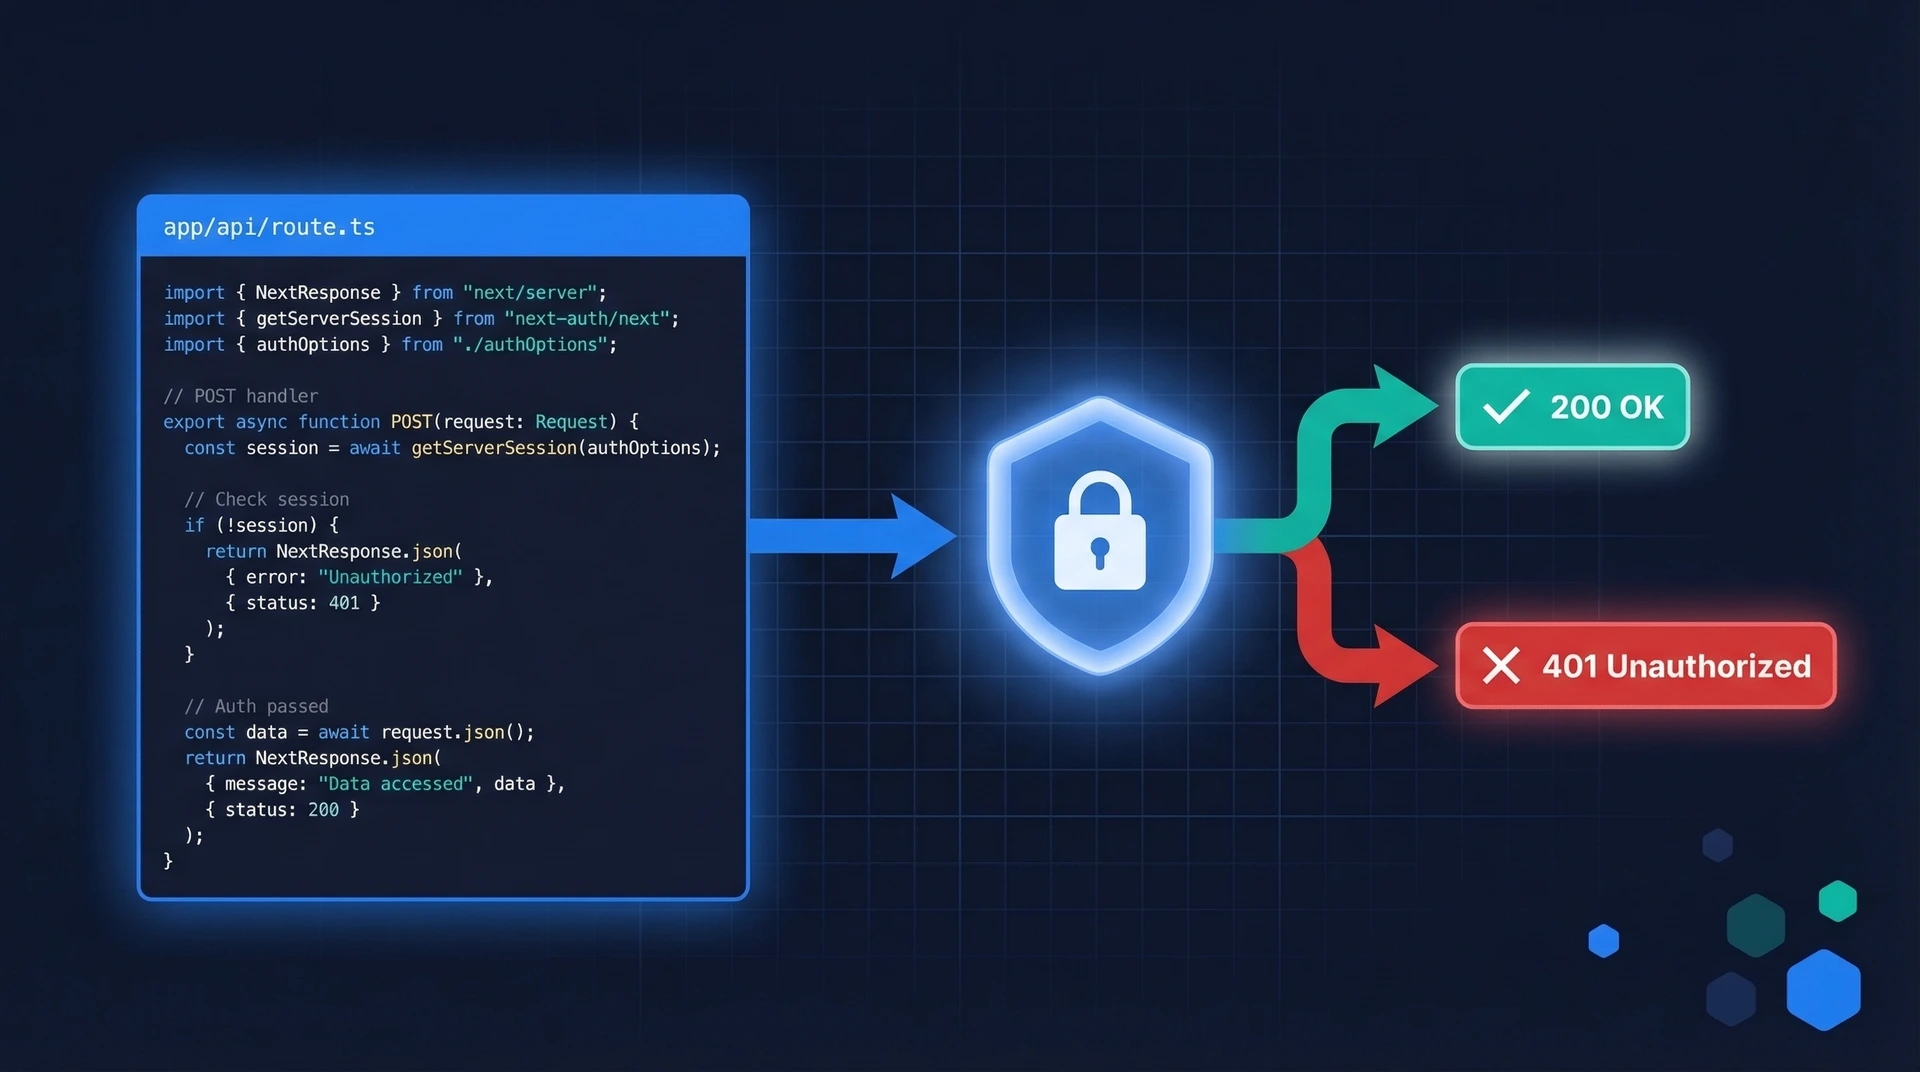
Here's a complete GET endpoint that returns 401 if the user isn't authenticated, and the user's profile data if they are:
// app/api/profile/route.ts
import { NextRequest, NextResponse } from "next/server";
import { cookies } from "next/headers";

async function getSessionUser(sessionToken: string) {
  // Replace with your real session validation logic:
  // verify a JWT, query a session store, or call your auth provider.
  if (sessionToken === "invalid") return null;

  return { id: "user_123", email: "alice@example.com", role: "user" };
}

export async function GET(request: NextRequest) {
  // 1. Read the session cookie
  const cookieStore = await cookies();
  const sessionToken = cookieStore.get("authgear-session")?.value;

  // 2. If no token is present, reject immediately
  if (!sessionToken) {
    return NextResponse.json(
      { error: "Authentication required" },
      { status: 401 }
    );
  }

  // 3. Validate the token
  const user = await getSessionUser(sessionToken);

  if (!user) {
    return NextResponse.json(
      { error: "Invalid or expired session" },
      { status: 401 }
    );
  }

  // 4. Return the protected resource
  return NextResponse.json({
    id: user.id,
    email: user.email,
    role: user.role,
  });
}
Notice the two separate 401 checks: one for a missing token, one for an invalid token. This gives API clients clearer error messages without revealing which condition triggered the rejection.
If you're using Authgear for authentication, the @authgear/nextjs SDK provides a currentUser() helper that reads and validates the session cookie for you. This is the recommended approach — it keeps your code clean and ensures sessions are always validated correctly.
First, follow the Authgear Next.js setup guide to install the SDK and configure your project. Once that's done, protecting a Route Handler looks like this:
// app/api/profile/route.ts
import { NextResponse } from "next/server";
import { currentUser } from "@authgear/nextjs/server";
import { authgearConfig } from "@/lib/authgear";

export async function GET() {
  // currentUser() reads the Authgear session cookie and validates it.
  // It returns null if the user is not authenticated.
  // It also refreshes an expired access token automatically before
  // fetching user info from the Authgear userinfo endpoint.
  const user = await currentUser(authgearConfig);

  if (!user) {
    return NextResponse.json(
      { error: "Authentication required" },
      { status: 401 }
    );
  }

  // user.sub is the user's unique ID (subject claim)
  // user.email is the user's email address
  return NextResponse.json({
    userId: user.sub,
    email: user.email,
  });
}
The currentUser() helper works the same way in React Server Components, Route Handlers, and Server Actions — a consistent pattern across your entire Next.js app.
Authentication answers "who is this user?" Authorization answers "what are they allowed to do?" Once you have a validated session, you can check the user's roles from their claims to implement role-based access control.
Authgear exposes roles via the https://authgear.com/claims/user/roles claim — an array of role strings returned in the userinfo response. Here's an admin-only endpoint that returns 403 Forbidden for authenticated users who don't have the admin role:
// app/api/admin/users/route.ts
import { NextResponse } from "next/server";
import { currentUser } from "@authgear/nextjs/server";
import { authgearConfig } from "@/lib/authgear";

export async function GET() {
  const user = await currentUser(authgearConfig);

  // Step 1: Check authentication
  if (!user) {
    return NextResponse.json(
      { error: "Authentication required" },
      { status: 401 }
    );
  }

  // Step 2: Check authorization
  // Authgear returns roles in the https://authgear.com/claims/user/roles claim.
  // Assign roles to users in the Authgear portal under Users > Roles & Groups.
  const roles = user["https://authgear.com/claims/user/roles"] as string[] | undefined;

  if (!roles?.includes("admin")) {
    return NextResponse.json(
      { error: "Admin access required" },
      { status: 403 }
    );
  }

  // Step 3: Return admin-only data
  const users = await fetchAllUsers(); // your data layer
  return NextResponse.json({ users });
}
The two-step pattern — authenticate first, authorize second — is intentional. Always verify identity before checking permissions: there's no point evaluating roles for an anonymous request.
Server Actions ("use server" functions) let you call server-side logic directly from components. They look like regular async functions, but under the hood they are HTTP endpoints — which means they need the same authentication checks as Route Handlers.
// app/actions/update-profile.ts
"use server";

import { currentUser } from "@authgear/nextjs/server";
import { authgearConfig } from "@/lib/authgear";
import { redirect } from "next/navigation";

export async function updateProfile(formData: FormData) {
  // ALWAYS check auth inside the action itself.
  // Never assume the caller is authenticated just because
  // the page that rendered the form checked auth before rendering.
  const user = await currentUser(authgearConfig);

  if (!user) {
    // For Server Actions called from forms, redirecting to login is acceptable.
    // For actions called programmatically, consider throwing an error instead.
    redirect("/login");
  }

  const displayName = formData.get("displayName") as string;

  // Proceed with the update...
  await saveDisplayName(user.sub, displayName);
}
The auth check is inside the action itself — not just on the page that renders the form. This matters because Server Actions are independent HTTP endpoints. Anyone can call them directly, bypassing any page-level auth checks you've added.
// middleware.ts — a first line of defence, but NOT sufficient on its own
import { NextRequest, NextResponse } from "next/server";

export function middleware(request: NextRequest) {
  const session = request.cookies.get("authgear-session");
  if (!session) {
    return NextResponse.redirect(new URL("/login", request.url));
  }
}

export const config = {
  matcher: ["/api/:path*"],
};
The problem: Middleware runs at the Edge, before your Route Handler executes. It can reject obviously invalid requests quickly — but it cannot be your only security layer:
The fix: Always add an auth check inside the Route Handler itself. Use middleware as a fast first pass that rejects obviously unauthenticated requests — but treat the handler-level check as the actual security guarantee. This is defence in depth.
See the Next.js middleware authentication guide for a deeper look at what middleware should and shouldn't do.
| Mistake | Why it's a problem | Fix |
|---|---|---|
| Returning 200 with an error message for auth failures | API clients can't reliably detect auth errors without parsing the body | Always use 401 or 403 status codes |
| Skipping auth in Server Actions | Server Actions are public endpoints; anyone can call them directly | Add a currentUser() check at the top of every non-public action |
Storing tokens in localStorage |
Vulnerable to XSS attacks | Use HttpOnly cookies for session tokens |
| Not checking expiry on validated sessions | Expired sessions can still pass basic signature checks | Use a library or SDK that validates expiry automatically |
401 Unauthorized means the request has no valid identity — the session cookie is missing, the token is absent, or the token is invalid or expired. The client should prompt for login. 403 Forbidden means the request has a valid identity, but that identity doesn't have permission for this action. The client should show an "access denied" message, not a login prompt. Using the correct code lets API clients respond appropriately without parsing your error body.
Yes — that's one of the main benefits of the Authgear Next.js SDK. currentUser() from @authgear/nextjs/server works consistently in Route Handlers, Server Components, and Server Actions. It reads and validates the session cookie using the same logic regardless of where it's called, so you don't need different authentication code for different parts of your app.
The safest default is to require authentication on every Route Handler and explicitly mark public ones as intentionally open. This "secure by default, opt out for public" approach ensures a newly added endpoint is never accidentally left unprotected. For endpoints that should be public — a health check, a webhook receiver — add a comment explaining why no auth is needed.
Next.js does not add CORS headers to Route Handlers automatically. If your Route Handler should only be called from your own frontend, check the Origin header and reject requests that don't match your domain. For endpoints that need to accept cross-origin requests, configure CORS headers explicitly in the Response. Note that Server Actions have built-in CSRF protection via Origin/Host header comparison — Route Handlers do not get this automatically.
Privacy is important to us, so you have the option of disabling certain types of storage that may not be necessary for the basic functioning of the website. Blocking categories may impact your experience on the website.